How to Adjust Brake Mechanism for Optimal Performance?
The performance of a vehicle's brake system is critical for safety and efficiency. According to the National Highway Traffic Safety Administration, improper brake adjustments contribute to approximately 8% of vehicle accidents annually. This highlights the importance of a well-functioning Brake Adjustment Mechanism. When adjusted correctly, brakes not only improve stopping distances but also enhance overall driving comfort.
An effective Brake Adjustment Mechanism ensures that brake pads engage uniformly. However, many drivers overlook regular maintenance. A recent survey indicated that over 50% of vehicle owners neglect brake system checks. This negligence can lead to uneven wear and decreased braking power, exposing drivers to greater risks on the road.
Understanding the intricacies of the Brake Adjustment Mechanism can help vehicle owners take proactive steps. Many misconceptions exist regarding brake adjustments, leading to improper techniques being applied. Regular calibration can significantly improve effectiveness. It’s not merely about tightening the brakes; it involves recognizing the signs of wear and addressing them promptly.
Understanding the Brake Mechanism: Types and Functions
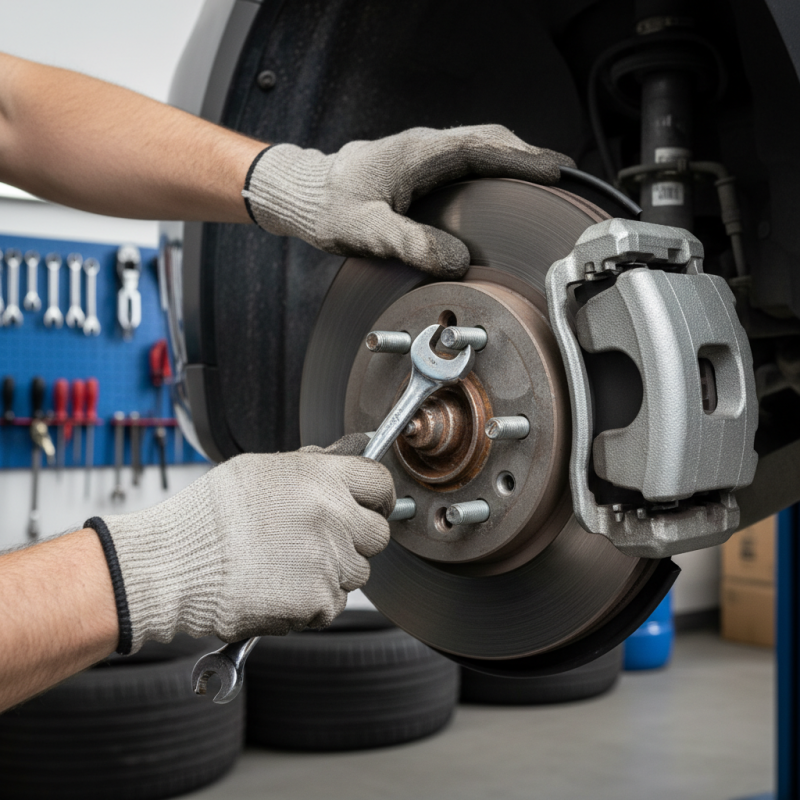
Understanding the brake mechanism is essential for optimal vehicle performance. Brake systems vary widely, with the most common types being disc and drum brakes. Disc brakes use a rotor and caliper, providing better heat dissipation. Drum brakes include shoes that press against a rotating drum, offering effective stopping power. Knowing these types enables better adjustments and maintenance.
To ensure your brakes work effectively, inspect them regularly. Look for wear on pads or shoes. If you hear unusual noises, this may indicate issues. Keep brake fluid at the recommended level. Low fluid can lead to inefficient braking. Replace worn components promptly to avoid safety hazards.
Tips: Always test your brakes after adjustments. A road test will reveal any lingering issues. Don’t ignore warning lights on your dashboard. They signal when maintenance is due. Recognizing symptoms early can prevent costly repairs. Reflect on your driving habits as they impact brake life, too.
How to Adjust Brake Mechanism for Optimal Performance?
| Brake Type | Function | Adjustment Method | Optimal Adjustment Value |
| Disc Brake | Provides high stopping power and heat dissipation. | Caliper alignment and rotor condition check. | 0.02-0.05 inches gap between pads and rotor. |
| Drum Brake | Offers good emergency braking capabilities. | Adjust shoes to drum clearance. | 0.03-0.06 inches between shoes and drum. |
| Anti-lock Brake System (ABS) | Prevents wheel lock-up during braking. | Check sensor alignment and wheel speed signals. | Calibration per vehicle specifications. |
| Hydraulic Brake | Utilizes fluid pressure to operate brake components. | Bleed brake lines for air gaps. | Maintain fluid level to manufacturer's spec. |
Common Signs of Brake System Inefficiency
Brake system inefficiency can manifest in several noticeable ways. One common sign is a spongy brake pedal. If the pedal feels soft or sinks to the floor, it could indicate air in the brake lines or a fluid leak. According to the National Highway Traffic Safety Administration, such signs can reduce stopping distances significantly, increasing accident risks.
Another indicator of brake issues is squeaking or grinding noises. These sounds often suggest worn brake pads or insufficient lubrication. Research shows that ignoring these signs can result in costly repairs. A study published in the Journal of Mechanical Engineering highlights that vehicle owners may face repair bills up to 50% higher if minor issues go unchecked.
Vibrations in the steering wheel when braking can signal warped rotors. This scenario requires immediate attention. The Institute of Transportation Engineers states that failing to address warped rotors can exacerbate braking problems. Regular inspections can help identify these issues before they escalate, ensuring driver safety and vehicle performance.
Step-by-Step Guide to Adjusting Brake Tension
Adjusting the brake tension is crucial for optimal performance. A well-adjusted brake mechanism ensures safety and enhances riding efficiency. According to a report by the Bicycle Product Suppliers Association, improper brake settings can lead to a 20% decrease in stopping power. Thus, regular adjustments are vital for cyclists.
To begin adjusting brake tension, inspect the brake pads. They should contact the rim evenly. If they do not, loosen the lock nut and reposition them. Ensure the pads are 1-2 mm from the rim for effective operation. Tightening the cable will improve responsiveness. Be vigilant; over-tightening can lead to premature wear.
Tip: Always test the brakes after adjustments. Squeeze the levers gently to check for proper contact. If you notice any sluggish response, adjust the cable tension again.
Another critical step is to check alignment. Misalignment can lead to uneven wear and decreased performance. Use a ruler to ensure the pads align with the rim's plane. If they sit unevenly, this adjustment might take several tries. Remember, it can be frustrating at times, but your safety depends on it.
Tip: Document your settings and adjustments. This record can help you track performance changes and refine your technique. Regular maintenance and awareness make a significant difference. Adjusting brake mechanism tension is vital for any serious cyclist.
Tools and Safety Precautions for Brake Adjustment
Adjusting the brake mechanism improves your vehicle's performance. However, safety should be your first concern. Always wear safety glasses and gloves when starting any adjustments. A well-ventilated area is best. Keep tools organized and close. You will need a wrench set, screwdrivers, and a torque wrench for precise adjustments.
In addition to safety gear, having a solid understanding of the brake system is crucial. Analyze the braking system before adjustments. Check for wear on pads and rotors. If they’re worn, the entire system can be affected. Brake fluid levels are also essential; insufficient fluid can lead to failures. While adjusting, small mistakes can lead to significant issues later. Consider each step carefully and repeat checks often.
After making adjustments, take the car for a test drive. Be aware of squeaks or grinding noises; these signals indicate further adjustments may be needed. Understand your brake system isn't perfect. Even the best mechanics face challenges. Reflect on what adjustments were effective and what needs improvement for future work. This thoughtful approach ensures consistent performance.
Routine Maintenance Tips for Optimal Brake Performance
Routine maintenance of your vehicle's braking system is crucial for safety and performance. Regular checks can prevent costly repairs and ensure your brakes are always responsive.
Start by inspecting brake pads for wear. Thin pads can lead to reduced braking power. If the pads are worn beyond the recommended thickness, it’s time for a replacement.
Next, examine brake fluid levels and quality. Low fluid can affect braking response. Ensure there are no leaks in the system. Contaminated fluid should be flushed out. This small task can vastly improve brake feel.
Additionally, hear what's happening when you brake. Squeaking or grinding noises indicate potential issues. Ignoring sounds can lead to bigger problems down the road.
Visual checks are essential too. Look at the brake lines for signs of corrosion or wear. Cracked lines can cause dangerous failures. Pay attention to pedal feel. A spongy pedal can suggest air in the line.
Addressing these details now can prevent major incidents later. Consider scheduling regular inspections for peace of mind.